This English version of the course material has been machine translated from the Finnish original and may contain errors. If something is unclear, check the Finnish version of this page.
OpenCode
You can do the course’s [AI] exercises either with GitHub Copilot in VS Code or with the open source coding agent OpenCode. The grounds for the choice are explained in exercise 9 of week 2. This page explains how to install OpenCode and how to use it. The exercise descriptions contain instructions for both tools: when you choose OpenCode with the switch at the beginning of an exercise, the description is shown for OpenCode.
OpenCode is just an agent and has no language model of its own. Using it therefore requires an API key for some language model service, e.g. Anthropic, OpenAI, Google or OpenRouter. University students can, however, use the language models of CurreChat free of charge, and this is the recommended way on the course, see Using CurreChat. The agent concepts, such as context, instruction file, plan mode and MCP, are the same as in the material AI in software engineering, so the course exercises work just as well with OpenCode.
Note: the exercises were originally made for Copilot, and the OpenCode versions of the exercises for weeks 5–7 have not yet been tested as thoroughly. If there are errors or unclear parts in the instructions, please report them.
Why OpenCode?
- OpenCode is open source, and it works in the terminal independently of the editor. The way it is used resembles Claude Code.
- It supports dozens of language model services, so you can switch models freely. Locally run models can also be used.
- Many features are compatible with other tools, for example the instruction file
AGENTS.mdand skills in the Agent Skills format.
OpenCode evolves quickly. If some instruction below no longer holds, check the up-to-date information in the documentation.
Installation
The easiest way to install is npm, if you have Node.js installed:
npm install -g opencode-ai
On macOS and Linux you can also install it with Homebrew:
brew install anomalyco/tap/opencode
On Windows, OpenCode works best inside WSL. Alternatively, you can install it with npm, Scoop (scoop install opencode) or Chocolatey (choco install opencode).
Check the installation with the command opencode --version.
Connecting a language model service
The recommended way is to use CurreChat. If you already have an API key for some other service, you can use that too, see Other language model services.
Using CurreChat
As a university student you can use CurreChat’s language models in OpenCode, in which case you do not need your own paid API key. The API key and a ready-made OpenCode configuration are obtained from CurreChat:
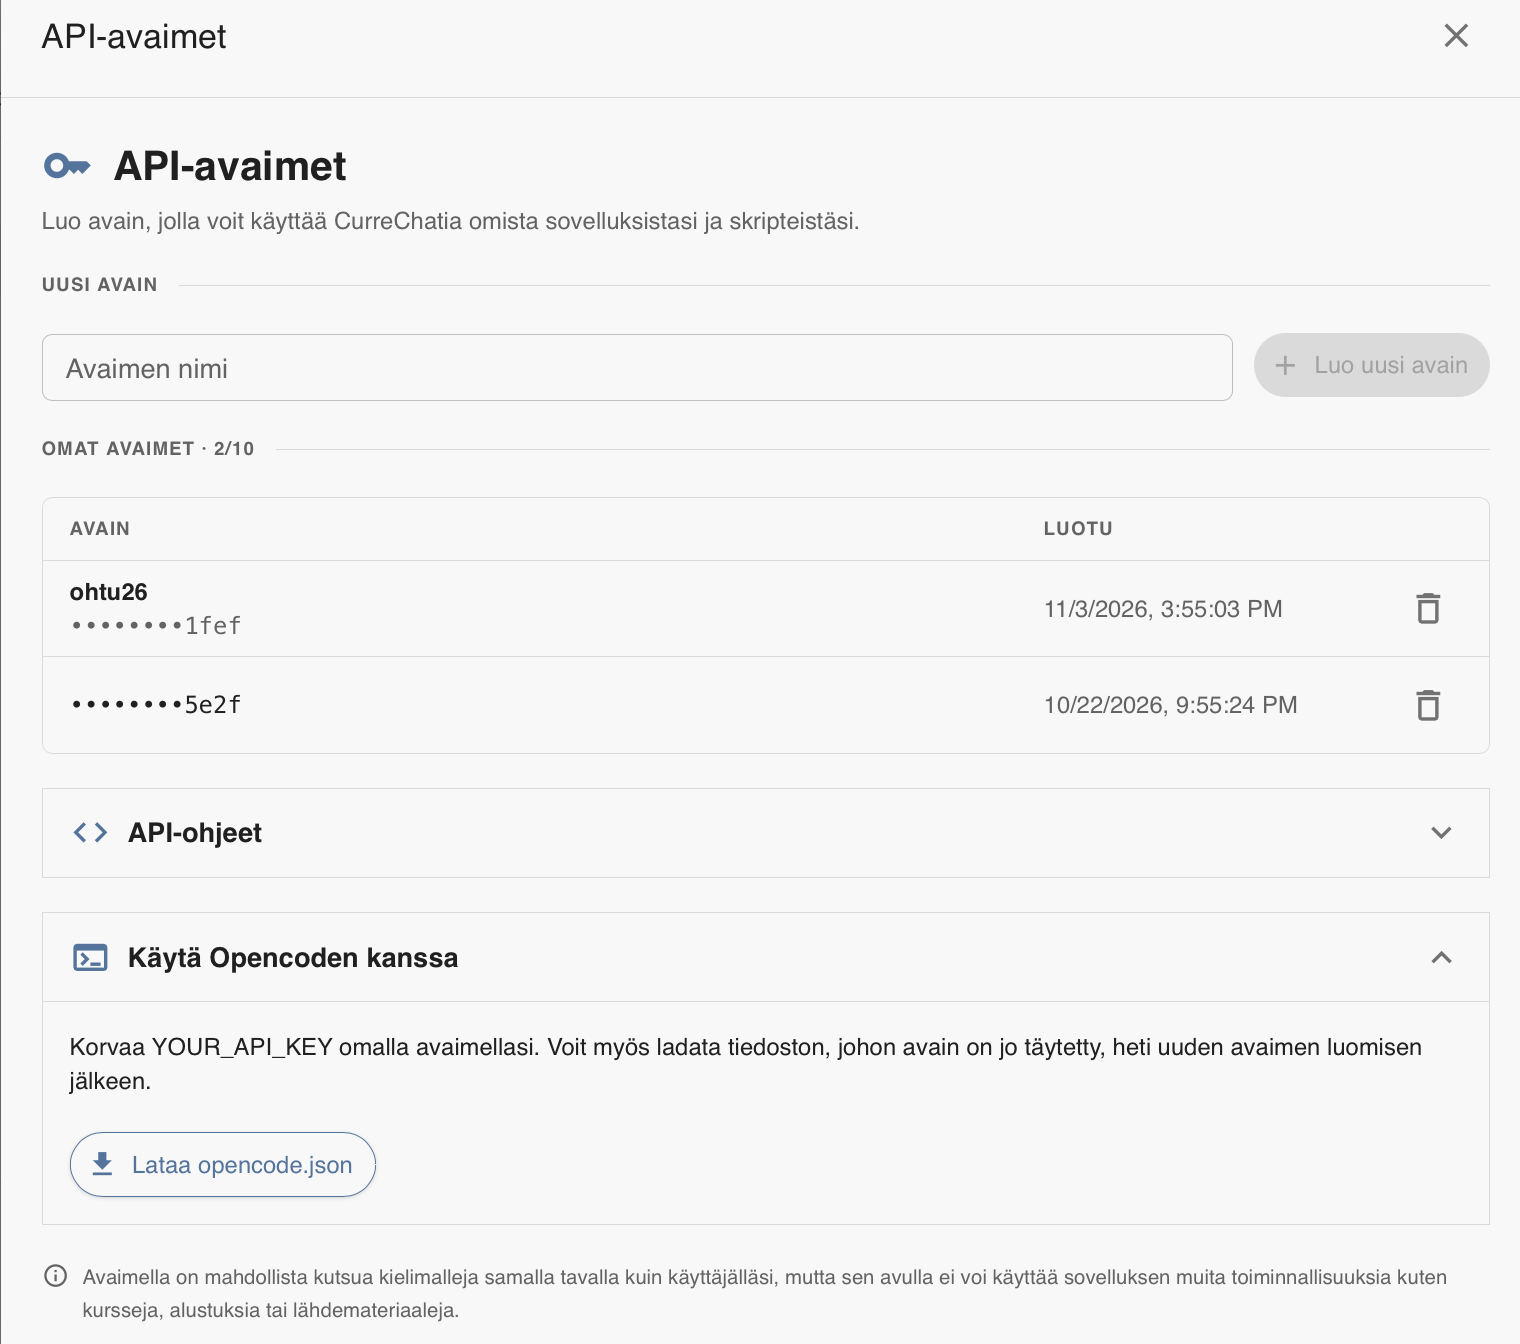
- Open API-avaimet (API keys) from the hamburger menu in the top right corner of CurreChat
- Give the key a name, e.g. ohtu26, and press Luo uusi avain (Create new key)
- A box Uusi avain luotu (New key created) appears. Press Lataa opencode.json (Download opencode.json) in it, and you get a configuration with your key already filled in. The key is shown only once, so if you need it later, copy it to a safe place with the Kopioi (Copy) button. You can also get the configuration later from Käytä Opencoden kanssa (Use with OpenCode), but then you have to replace
YOUR_API_KEYin the file with the key yourself - Move the downloaded file to
~/.config/opencode/opencode.json(or to the project root asopencode.json). If the directory ~/.config/opencode already has a fileopencode.jsonc, copy the contents of the downloaded file into it instead of creating a second file next to it
Do not save the key in a public repository. If you put the configuration in the project root, add opencode.json to the .gitignore file.
The following models are available in the configuration:
| Model | Token limit |
|---|---|
gpt-6-luna |
1,200,000 tokens per week |
gpt-5-mini |
1,200,000 tokens per week |
gpt-5.5 |
200,000 tokens per week |
gpt-6.1-sol |
200,000 tokens per week |
Mistral-Large-3-1 |
200,000 tokens per week |
gemma-4-26B-A4B |
no limit |
Note: CurreChat’s tokens are not unlimited. So use primarily the model gpt-6-luna, which together with gpt-5-mini has the largest weekly limit, and switch to a heavier model only if it cannot handle the task. You switch models in OpenCode with the command /models, which opens a list of the available models. If you run out of tokens, you can get more by sending a message to matti.luukkainen@helsinki.fi or to the user mluukkai on Discord.
Gemma 4 is free. It is an open model run on the university’s own hardware in the OpenShift cluster of the IT Center (Tietotekniikkakeskus), so its performance is limited.
Other language model services
If you want to use some other language model service, start OpenCode in the terminal with the command opencode and give the following command in its user interface
/connect
Choose from the list the service whose API key you have, and paste the key when asked. Then choose the model to use with the command
/models
You can also connect directly from the command line with the command opencode auth login, and you can see the available models with the command opencode models. The list of supported services and service-specific instructions can be found in the documentation.
A handy option is OpenRouter, which with a single API key gives you access to practically any language model, from Anthropic’s, OpenAI’s and Google’s models to open models. This makes it easy to try out and compare different models without having to create an account for each service.
Usage with an API key is usually billed by the tokens used, and agentic coding consumes a lot of them. Set a monthly usage limit in the service’s dashboard so that the bill does not come as a surprise. The choice of model has a significant effect on the price, and a mid-range model is usually quite enough for the course exercises.
Usage
Unlike Copilot, which is integrated into the VS Code editor, OpenCode is an application that runs in the terminal. The conversation with the agent happens in the terminal, and the changes the agent makes show up in the files just as when using Copilot. So you can read and edit the code in any editor, including VS Code, and you can use OpenCode e.g. in VS Code’s own terminal or in a separate terminal window.
In your submission repository, go to the project directory, e.g. the project of the week 2 [AI] exercise, and start OpenCode:
cd viikko2/nhl-reader
opencode
As with Copilot, open OpenCode only in the directory of the project you are working on. The course submission repository contains many projects, and the agent easily gets confused if it sees all of them.
Instruction file
The command /init analyses the project and creates the instruction file AGENTS.md in its root. OpenCode reads the instruction file automatically at the beginning of every conversation. The same file is also used by e.g. Copilot and Codex. Read the generated file and fix it if needed, see Managing context.
Build and Plan agents
OpenCode has two built-in agents, and you switch between them with the Tab key. The selected agent is shown in the bottom right corner of the screen.
- Build makes changes to the code and runs commands. It corresponds to Copilot’s Agent mode.
- Plan does not change the code; instead it explores it and draws up a plan. It corresponds to Copilot’s Plan mode, and it can also be used for questions like Copilot’s Ask mode. More on the importance of planning in the section Plan first.
Referring to files
By typing @ and the beginning of a file name you can attach the file to your request, e.g. Selitä miten @src/player_reader.py toimii (“Explain how @src/player_reader.py works”). This corresponds to Copilot’s #file reference.
Undoing changes
The command /undo undoes the agent’s latest changes, and the command /redo restores them. The real safety net, however, is still version control: commit after every accepted step and read git diff before committing, see Git as a safety net.
Approving commands
Note: Unlike Copilot in VS Code, OpenCode by default runs commands and edits files without asking for permission. If you want to approve commands and edits yourself, add a file opencode.json to the project root:
{
  "$schema": "https://opencode.ai/config.json",
  "permission": {
    "bash": "ask",
    "edit": "ask"
  }
}
You do not need to create the file separately for each project. OpenCode looks for configuration not only in the directory where it was started but also in all of its parent directories, and merges the settings of the files it finds. On the course, the easiest option is to put the file in the root of the submission repository, so that the setting applies to the projects of all weeks:
palautusrepositorio
├── opencode.json
├── viikko1
├── viikko2
│   └── nhl-reader
└── ...
If some project also has its own opencode.json, such as the MCP server definitions of week 7, its settings are merged with the settings of the file in the root. In conflicts concerning the same setting, the file closer to the start directory wins.
You can also put the setting in the file ~/.config/opencode/opencode.json, which applies to all projects on your machine.
Copilot features in OpenCode
| Copilot (VS Code) | OpenCode |
|---|---|
| Ask, Agent and Plan modes | Plan and Build agents (Tab switches) |
.github/copilot-instructions.md or AGENTS.md |
AGENTS.md (created with the command /init) |
#file reference |
@ reference |
prompt files .github/prompts/*.prompt.md |
commands .opencode/commands/*.md, see the documentation |
skills .github/skills/ |
skills .opencode/skills/, .claude/skills/ or .agents/skills/ |
MCP servers .vscode/mcp.json |
MCP servers under the mcp key of the opencode.json file |
For example, the Playwright MCP server of week 7 is defined in OpenCode as follows:
{
  "$schema": "https://opencode.ai/config.json",
  "mcp": {
    "playwright": {
      "type": "local",
      "command": ["npx", "-y", "@playwright/mcp@latest", "--browser", "chromium"],
      "enabled": true
    }
  }
}